A popular '02 modification has been to move the battery out of the engine compartment to improve f/r weight distribution, handling response, and to simply make more room. Usually, the battery is moved to the trunk and placed against the firewall and between the wheel wells, ideally in some kind of strong protective box that is securely mounted to the floor and firewall.
I have never liked the trunk-mount approach, though, because of the loss of valuable trunk space - that's where my toolbox goes! Instead, I had always thought that the space under the rear bench seat would be ideal. It is otherwise wasted space, it is almost the lowest point in the car and between the axles, and it is very well protected. The only problem was that the useable vertical space is very limited and the metal seat underframe could short out top-mounted terminals. Even small conventional batteries are just too tall and then you also have to worry about venting the explosive hydrogen gas and controlling acid spillage.
Fortunately, totally sealed, vent-less lead-acid starting batteries have become more available and affordable in recent years. The first suitable battery I was aware of was Optima. They have a very slim 6V unit that is only about 3.5" thick and can be mounted on its side so one could fit on either side of the driveline hump and be wired in series to get 12V. But, they are very expensive and not easily available, so I didn't jump at that approach, either. Unfortunately, I still had to make room for my EFI intake so I needed to do something.
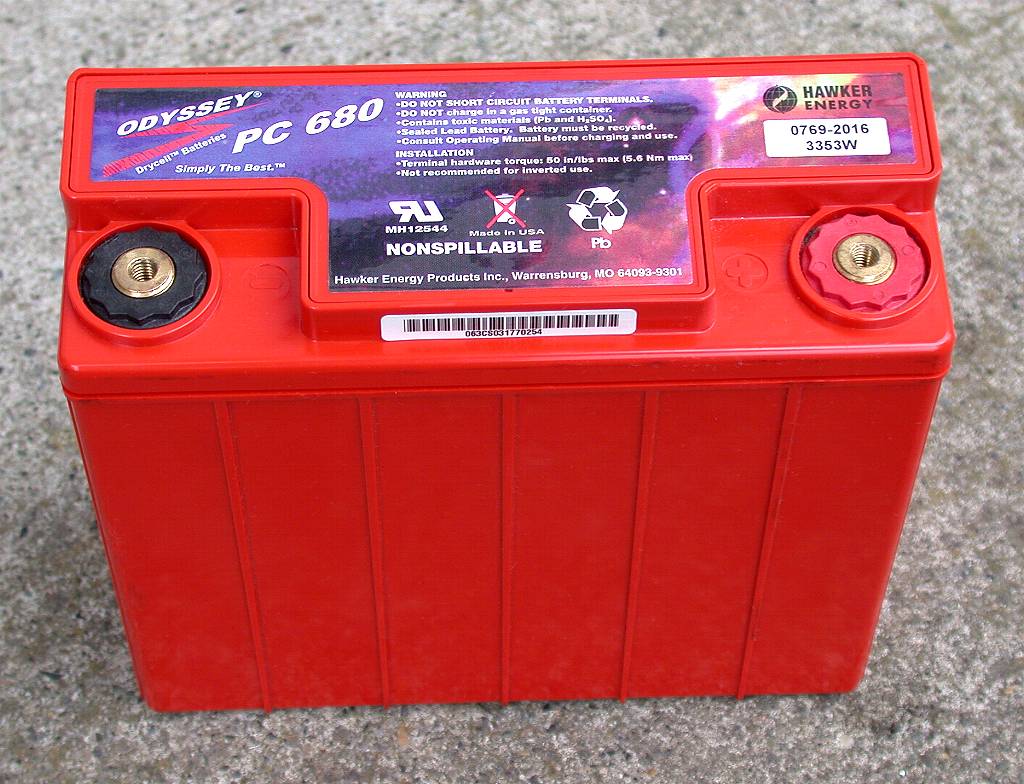
I gained new hope when I found out about Hawker Odyssey lead-acid dry batteries. Originally designed for use in military aircraft, they are available in many sizes and can be had fairly inexpensively from a wide number of sources - I bought mine from a seller on eBay for about $60 USD each, shipped. I used two of the model PC680 battery (metal jacketed version not required in this application), which is very thin at about 3 1/8" and fits a large number of motorcycles, Jet-Skis, etc. Two of these in parallel can deliver 1200 cranking amps and over 2000 amps into a dead short, so I figured this was more than enough to get my car started in worst-case scenarios. Though Vancouver typically has very mild winters going no lower than -10ºC, my car is a year-round daily driver so I need total reliability and some extra reserve capacity. If it were a summer-only car, though, I think one of these batteries would be just fine. But then again, I enjoy the overkill. Combined with the 80A alternator I installed in March 2003, I should have more than enough juice.
(Click on the pics
for a much closer look.)
Conceptually, this project is very simple - you mount the new batteries and run a wire up front to some kind of terminal block, then connect all the original wires to it. In execution, however, the details are what can drive you nuts. So, in the interests of promoting good mental health among the '02 community, I'll show you what I did. But, before I get started, you have to bear in mind that this is not a step-by-step how-to guide but more of a suggestion as to how you can solve the problems of relocating the '02 battery. If you are unsure about electrical stuff, you had better not attempt this conversion without some expert help. Big batteries store incredible amounts of energy - a short or miswired connection could set your car on fire, cause a battery to explode, burn you, or worse. Always, always ask yourself what will happen to things over time. If in doubt, add an extra bolt, screw, lock washer, fuse, or layer of insulation. You have everything to lose.
Still with me? Ok, here goes...
One major challenge is simply finding the right parts! For example, the #1 cable to 1/4" stud terminal lugs were impossible to find in-stock at any retail-capable auto/marine/industrial/solar electrical supply shop. I ended up going straight to the district warehouse of a large wholesale-only distributor of automotive electrical connectors and pleading with them to sell me some for cash - I think the tears are what finally worked.
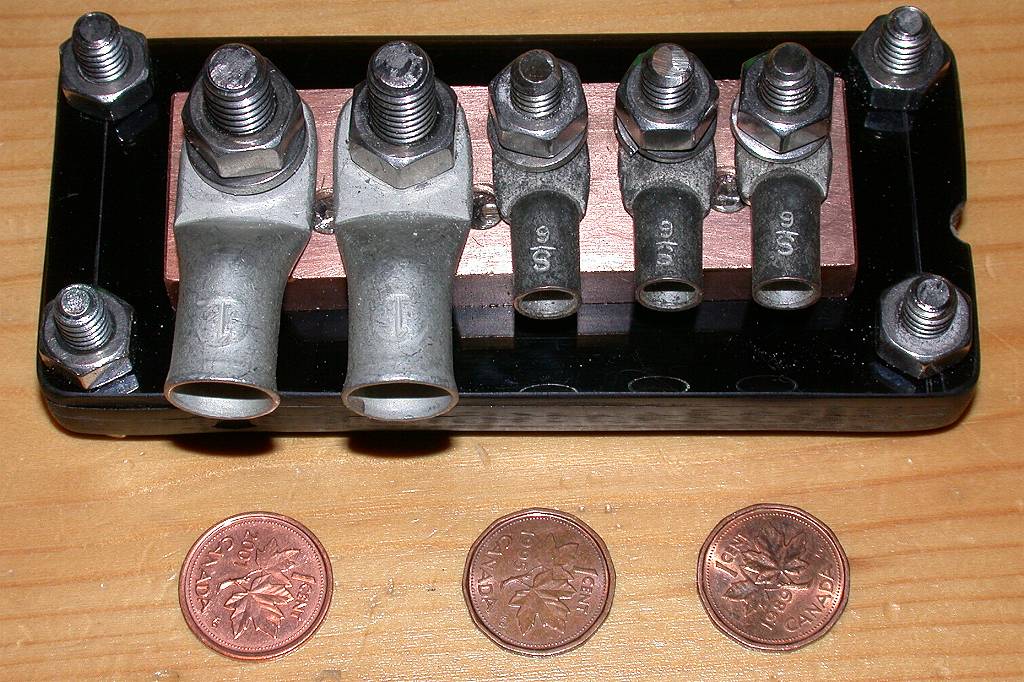
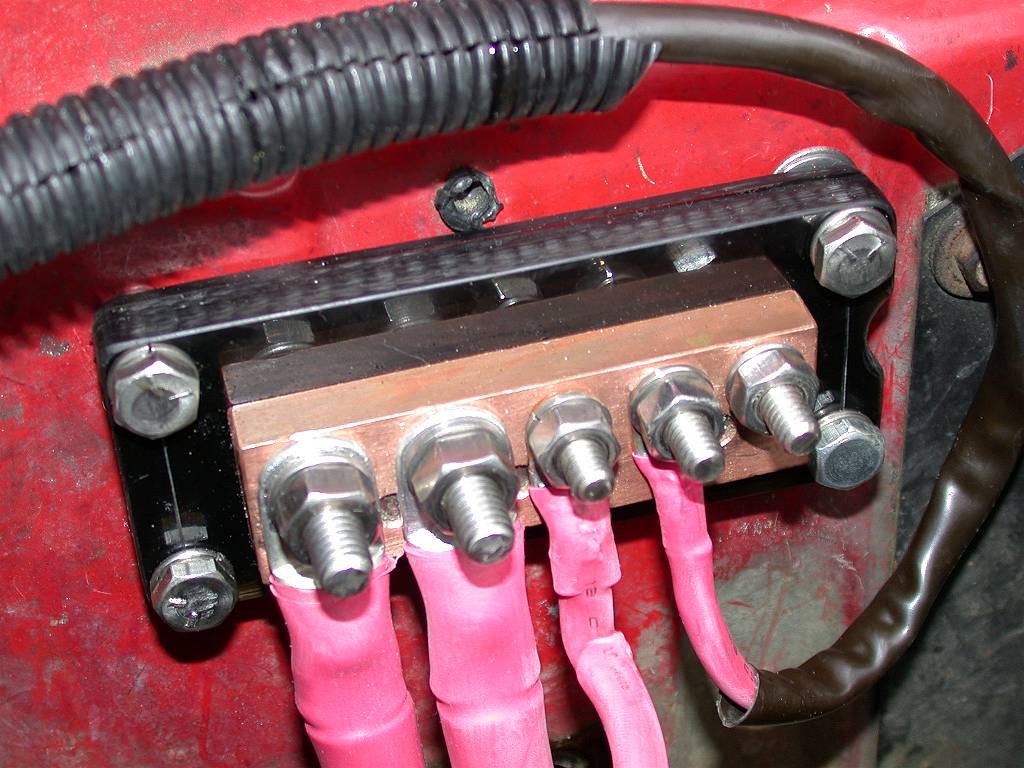
A particular toughie was the terminal block (AKA"bus bar" or "power distribution block"). Suitably heavy-duty four or five-stud terminal blocks from marine supply shops were just too big and bloody expensive. I have heard that such things may also be found in industrial electrical shops, but I had no such luck. I have also heard that terminal blocks from certain cars might be suitable, but I was too lazy to go junkyard hunting and so decided to build my own to suit my exact requirements.
The base is four layers of 1/8" Plexiglas (cause I had some) and the bus bar is 1"x3/8" copper stock that I drilled and tapped. The studs are stainless and made from bolts with heads cut off. The flathead screws holding the copper bar to the base were countersunk into three of the Plexiglas layers, with the fourth used to cover the heads and eliminate any chance of a short to the body. The notches in the sides are to help me put the layers back together properly. Looks simple, but it took a long time to fabricate in my mickey-mouse workshop. But heck, it has 27 parts!
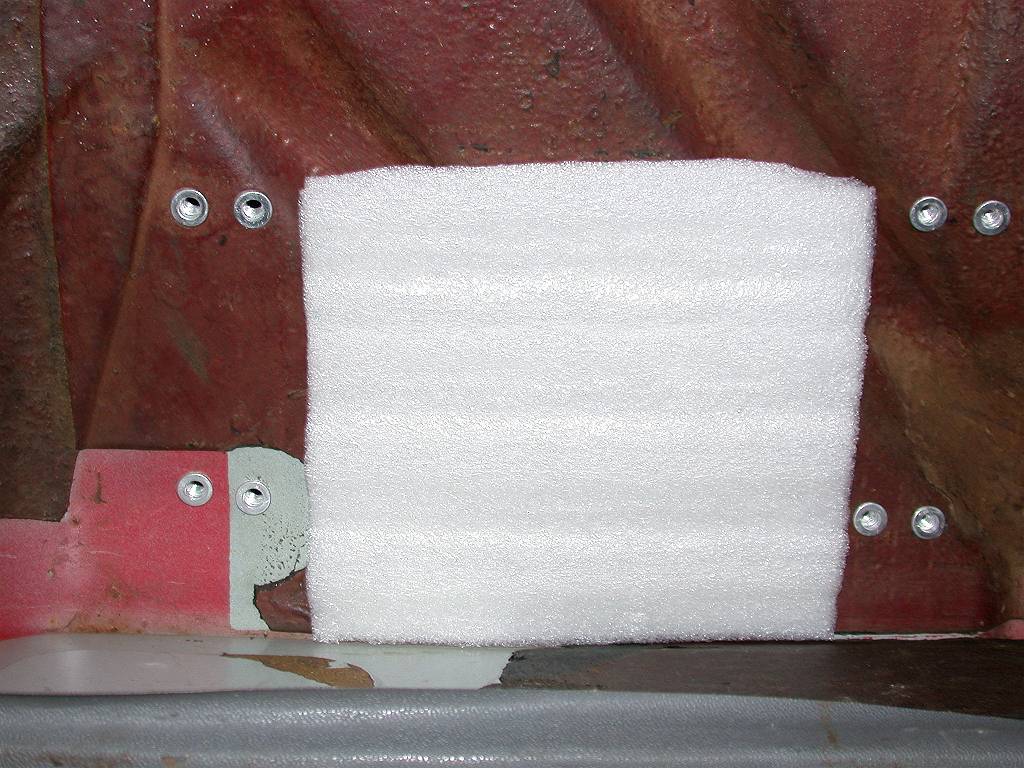
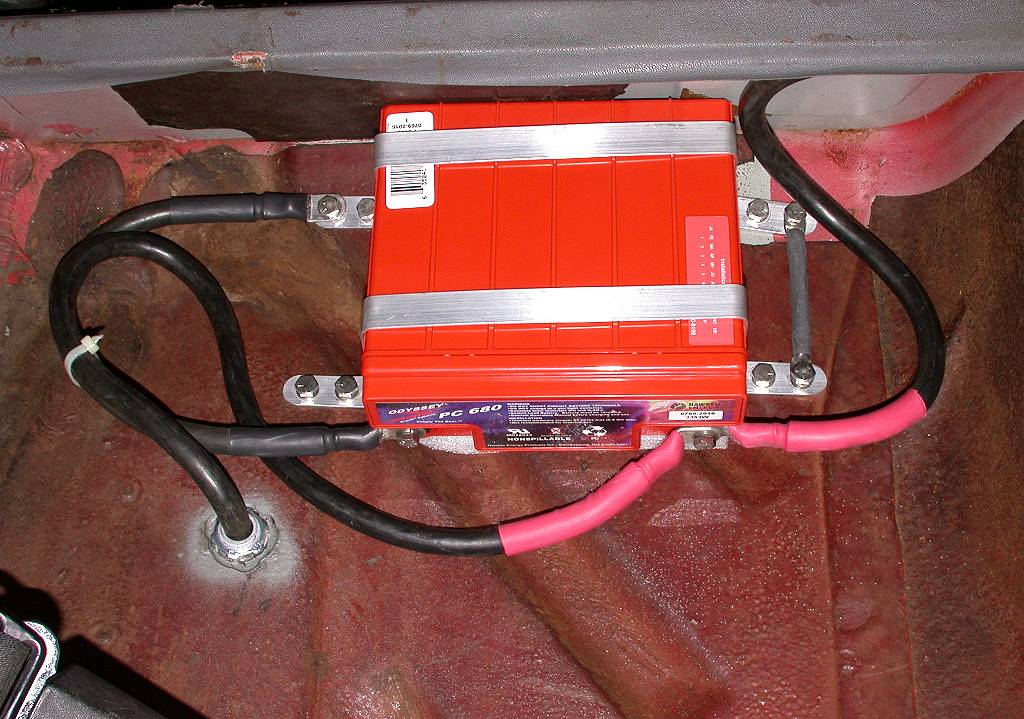
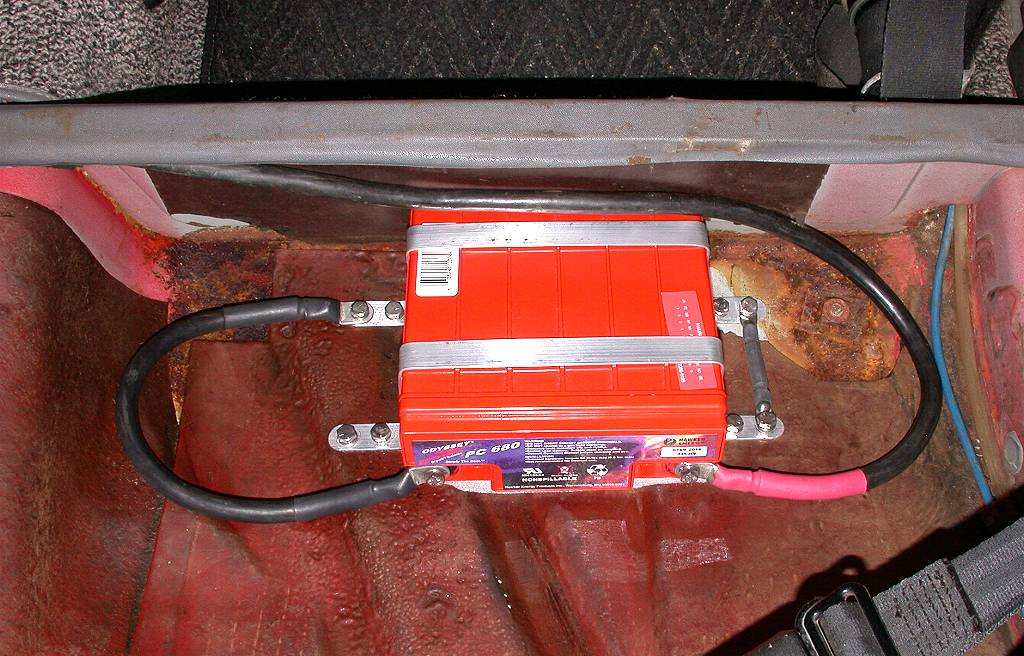
For mounting the batteries, I used rivet nuts to secure the brackets. It was tricky finding a position where all the bracket mounting holes were on fairly flat surfaces, since the floor is convoluted for strength. I did not de-burr the holes for the riv-nuts, thinking that the burrs would dig into the aluminum nut and help keep it from spinning, as well as make a better electrical connection. This was important since I would be grounding the batteries via the brackets. The white stuff is some 1/8" closed-cell foam used to help clamp the battery in place on the uneven surface. I would have preferred to use a denser neoprene material, and may still go to that but I am sure this is fine. Between the clamping force of the brackets and the friction of the foam, the batteries are completely immovable when mounted.
The brackets were made from about six feet of 3/4" by 1/16" aluminum flat stock, bent using c-clamps and the battery itself as a form for the main part and in a bench vise for the mounting flanges. Make sure to get generic, soft aluminum. Why do I say that? Well, I made the initial mistake of buying some surplus 7075-T6 aircraft aluminum that was more like hardened high-carbon steel - it was springy and it wouldn't bend, even when heated - it broke!
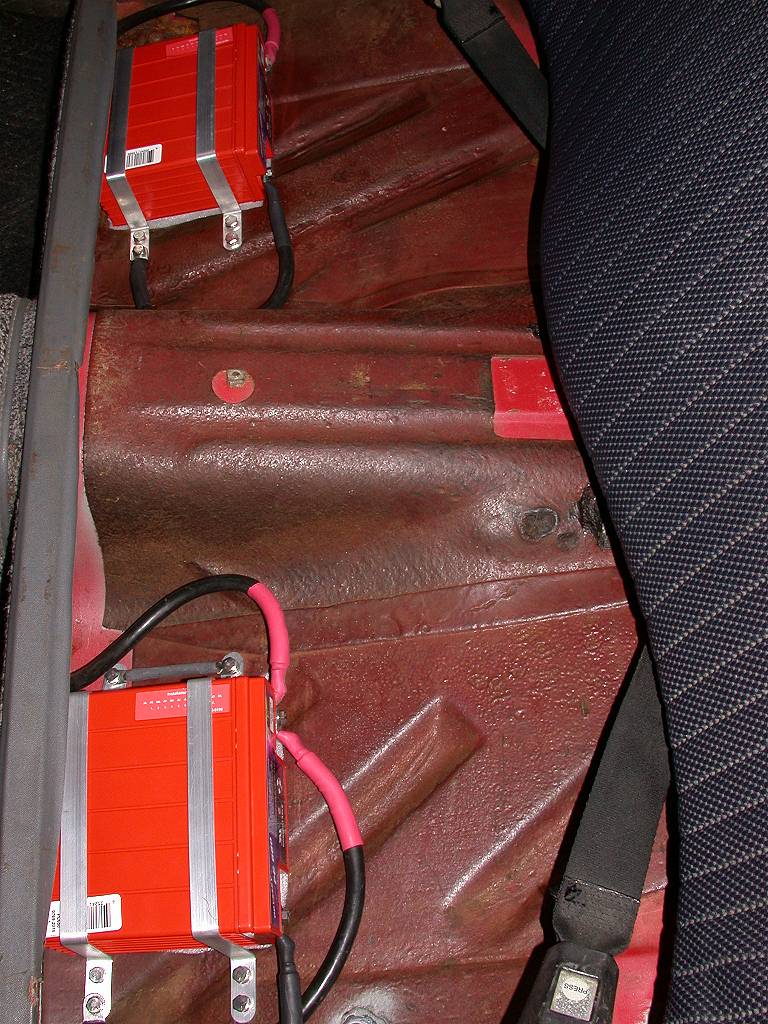
The batteries are wired in parallel. The joining positive cable runs over the hump mostly out of sight just under the seat support ledge, with some heater hose used to protect it from the sharp edge under there. I used the brackets themselves as the grounding points since I figured that the total of sixteen riv-nuts must be making reasonably decent contact with the body sheet metal. I connected the two brackets on each battery by a short #6 jumper wire so that all the mounting bolts would contribute to grounding.
Here is the driver's side, as seen from the rear:
Here is the passenger's side, again from the rear of the car:
(Damn, that's some major surface rust and a good reason to make sure your window seals are OK! I guess some POR-15 sessions are in my future.)
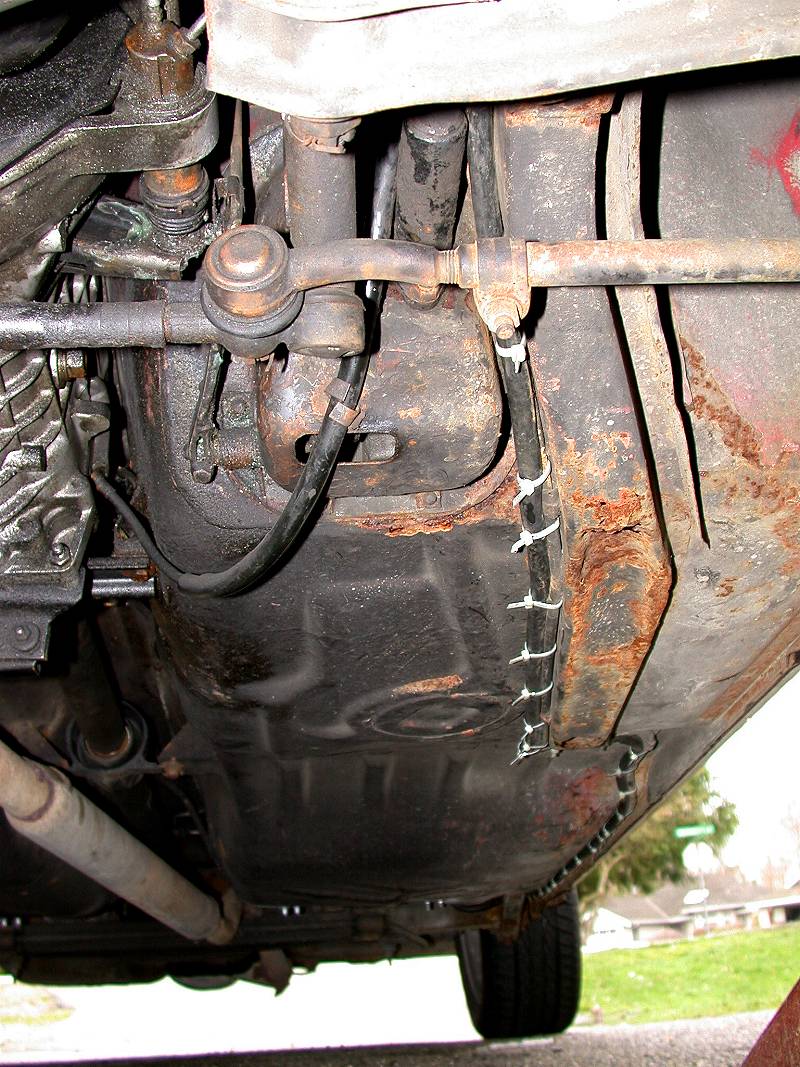
Running the cable to the engine bay is, naturally, the hardest part of this job. Initially, I had figured that I could just run the cable alongside the wiring harness inside the car on the driver's rocker, but that was a pipe-dream - there is no room to bring the cable through the firewall and the cable would be subject to being stepped-on by the driver. So, I bit the bullet and ran the cable underneath, zap-strapping it to the (fortunately) very solidly-mounted steel fuel return line. '72 and earlier '02s do not have a return line so this part will require adding brackets.
(So much rust...)
I used plenty of ties to make sure the cable was held securely and would not sag or move. Movement is what causes insulation to be worn-through and is not a risk you can take with a huge un-fused cable and batteries capable of delivering 2000 amps! I would have preferred black zap-straps, but I already had hundreds of the the natural ones in stock, so...
The cable itself is #1 AWG welding cable. It is more flexible and has a tougher jacket than normal primary battery cable but the main reason I chose this was that I found about 25 feet of it for $5 at a yard sale. ;-) Some battery relocation kits come with #4 cable, but I think #2 AWG or larger is best. The tradeoff is conductivity versus cost, weight, and ease of installation. #1 AWG seems like a good compromise. It also looks right to my eye.
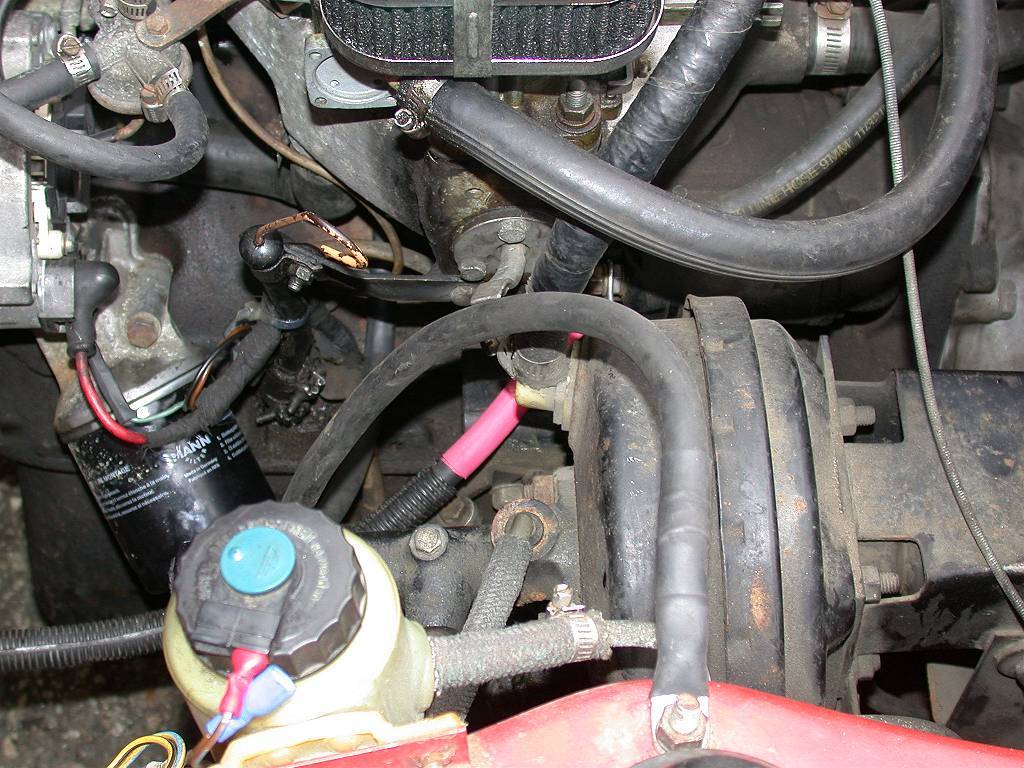
The cable pass-through location was selected to allow the cable to bend naturally out of the fitting without hanging too far down. It is protected somewhat by the sub-frame mount bracket. The bulkhead fitting is a generic weatherproof 1/2" PVC "Threaded Strain-Relief Connector" electrical conduit piece from the hardware store. It cost only $3 but you can pay lots more at a boat shop if you like. It has an o-ring where it mounts and an internal rubber seal ring (it comes with seals for several sizes and shapes of cable) that securely clamps and seals around the cable when the gland nut is tightened down. In the pic below you can also see the other side of the riv-nuts, and the zinc paint used to seal them against the weather. I should probably have used POR-15...
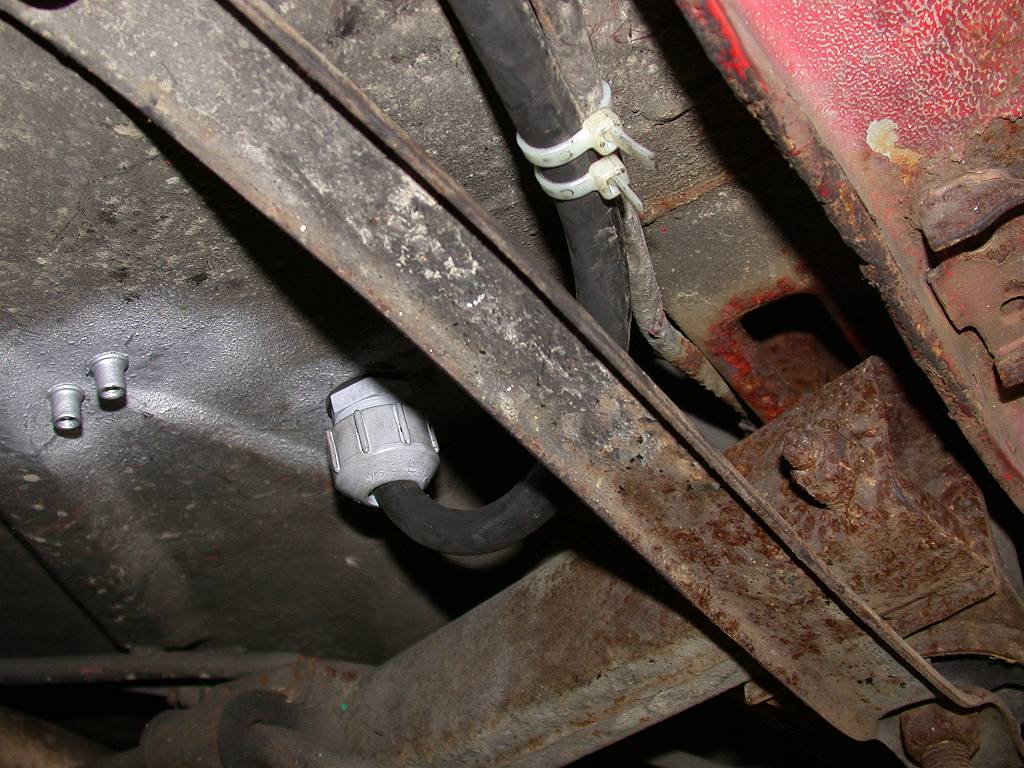
Strategically-placed sections of slit heater hose were used to protect the cable in places where it might be chafed by a rough surface, sharp edge, or where it can move. Extra attention was needed at the front where the cable comes up alongside and above the frame rail. I used some un-slit 5/8" ID heater hose at this point.
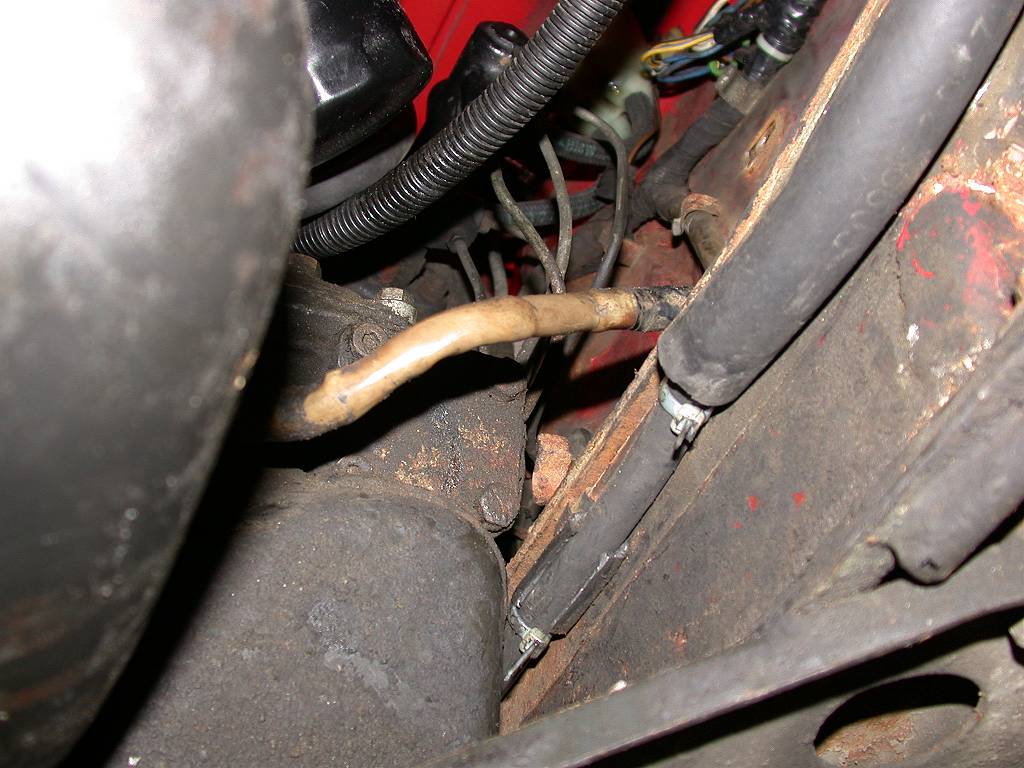
The front end of the main cable was secured with a coated metal clamp to keep it from moving at all.
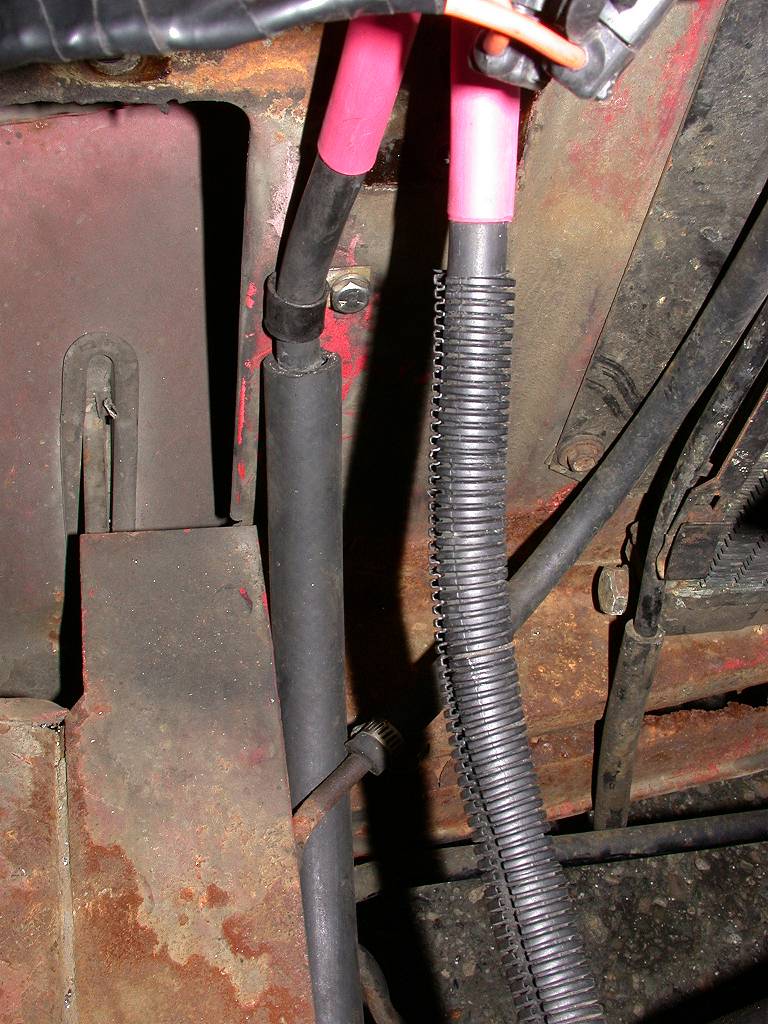
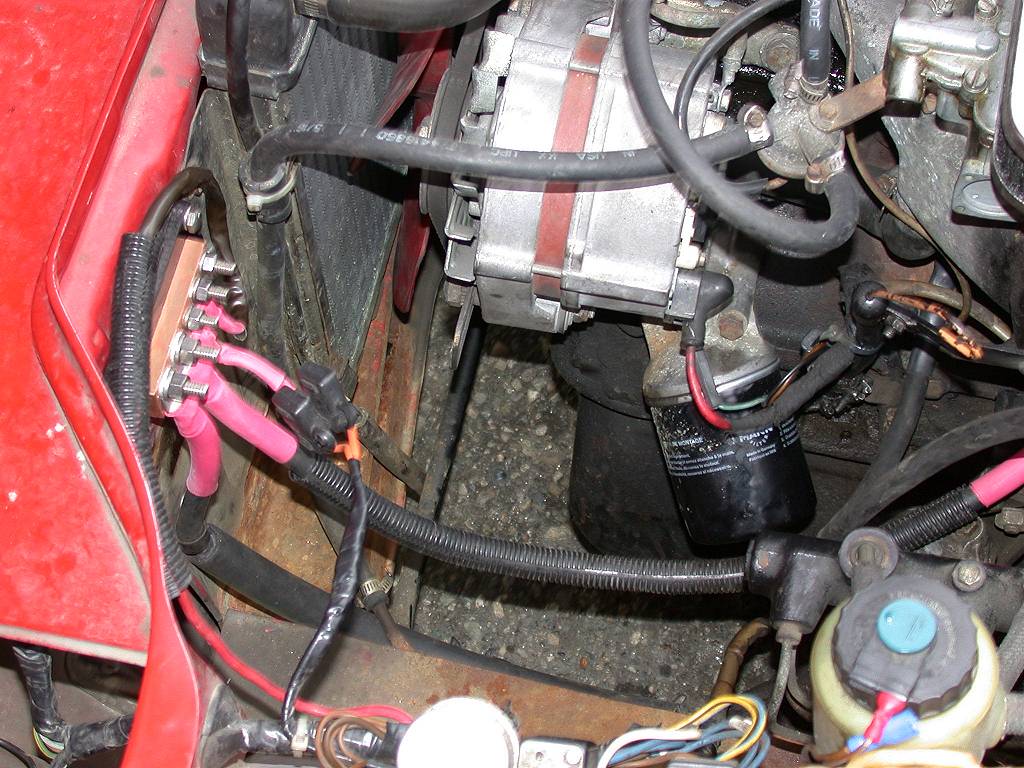
Once the battery tray was removed (easy on a '73 since it is only bolted-in), the terminal block was mounted to the radiator support using riv-nuts. Ideally, the terminal block would have a cover but it is safe-enough now that there is a lot of room in the area. It also provides a convenient place to attach a jumper cable. (Man, there is a lot of rust under that battery tray...)
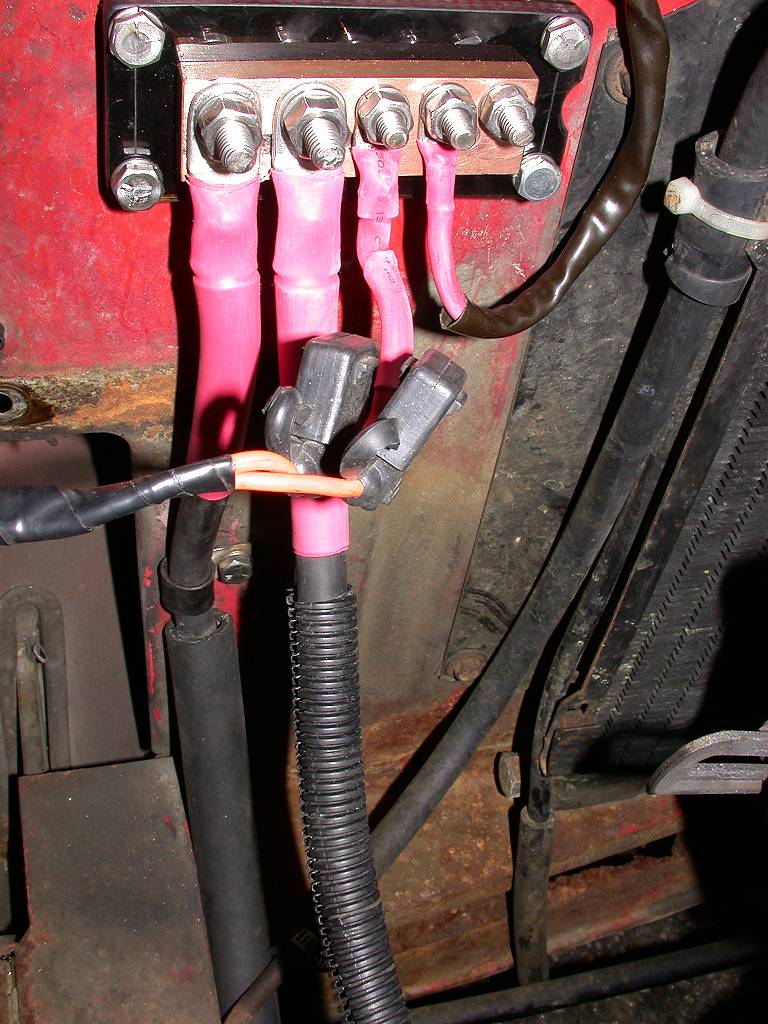
All of the cable ends were first crimped into the lugs to make a secure mechanical connection, then soldered using a huge 200W iron, and finally heat-shrink tubing was added to help weatherproof the joints and colour-code the positive connections. All of the hardware is stainless, while the rivet-nuts are aluminum. I used 1/4" bolts for the battery brackets, terminal block mounting, and the smaller terminal studs. 5/16" was used for the larger studs. Using 6mm and 8mm metric hardware would have been cooler and in keeping with the rest of the car, but I had all the SS inch stuff already in stock and no convenient supplier for metric.
Wiring is pretty simple - you just pretend the new terminal block is the positive post of the battery and connect whatever went to that to the terminal block. The two big wires are the main power feed cable and the cable to the starter motor. The smaller ones are the original main feed to the harness and a direct inline-fused power feed for the high and low beam relays (that I added to take the load off the original stalk and dash headlight switches after my hi-low beam switch burned up one fine moonless night). The extra terminal stud allowed for the electric engine fan conversion and EFI. One day, I will install a small weatherproof auxiliary fuse box to clean up the added-on wiring.
You also need to run a big ground wire from a solid spot on the body to the engine. In my case, this ground wire goes from a strut mount stud to a bolt on the forward starter bracket. Both are 8mm dia fasteners and I used the same #1 AWG welding cable with 5/16" lugs. You do have to be careful to route and dress the wires to allow for engine movement, as well as avoid chafing or interfering with the steering, etc. The two cables that go to the engine are an especially good place to use the highly flexible welding cable.
There sure is a lot of room in that engine bay, now. (And holy crap, look at all that rust!)
I chose to do this modification mainly because I needed the space for the EFI conversion but I also enjoy the other benefits. I am not sure if there is an overall weight advantage because even though the pair of Odyssey batteries is lighter than a standard battery, I added a lot of heavy cable. I do think the mass of the batteries secured to the floor of the cabin has helped to reduce noise a bit which makes sense since usually the most effective means of damping vibrations is to add mass to something. The handling does not feel dramatically different, but I do feel better just knowing the f/r balance is improved and the CG is a little lower... Maybe snow traction will be improved? (As if I'd subject the car to that!) At least, I can say that the starter now cranks faster than it ever has. A side-benefit of the now-excellent ground connections between the battery, engine, and body is that the coolant temperature and fuel gauge readings are absolutely rock-solid and correct.


